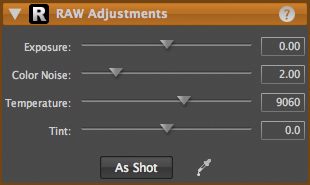
Raw adjustments
 The Raw Adjustments tool allows you to adjust various settings of a raw photo. Additionally, any “hot pixels” that are found are automatically removed.
For raw photos, using the single Raw Adjustments tool yields better results than if you had used the ZoneMapper (for an exposure adjustment), Noise Reduction, and White Balance tools separately.
Unlike other tools, the Raw Adjustments tool is special. For raw photos, it is always present at the bottom of the tool stack and can neither be disabled nor deleted. Additionally, it is always applied to the entire photo and can not be masked using regions.
To make raw adjustments to your photo:
- Double-click the title bar of the Raw Adjustments tool to expand it.
- Do either of the following:
- Use the sliders to adjust your photo:
- The Exposure slider adjusts the exposure. Moving the exposure slider to the left (yielding a negative value) performs highlight recovery in “blown out” areas of your photo.
- The Color Noise slider reduces the amount of “noise” that is often present in digital photos as a result of the sensors in digital cameras.
- The Temperature and Tint sliders adjust the temperature and tint of your photo to compensate for a color cast in the light source such as the blue cast of the sky or tungsten lighting.
- Alternatively, click the eyedropper button inside the tool (the mouse will change to an eyedropper), then click somewhere on your photo that you want to be neutral gray. Your photo’s colors will then shift accordingly. When satisfied with the raw adjustments, click the eyedropper button again to complete the adjustment.
- Use the sliders to adjust your photo:
- To reset the Temperature to its original value, click the As Shot button.
Note: Noise, and reductions to it, are most easily seen while looking at a digital photo at the pixel level by selecting View > Actual Pixels.